Sunday, August 28, 2016

ASR installation for Metasolv 6.2.x

As mentioned in earlier posts our Metasolv installation is clustered so we will do ASR installation in clustered environment.

Pre Installation checklist


Metasolv 6.2.x is installed.

below paths are set as per your directory structure.

PATH= BEA_Home/jdk_version/bin $PATH
BEA_HOME=/opt/app/mss_home/bea(installation directory of Oracle Weblogic 10.3 server)
JAVA_HOME=/opt/app/mss_home/bea/jdk_version

Installation of ASR


STEP 1. 


From Metasolv installation directory mss_home run the following command.

java -jar Asr.releaseNo.buildNo_M62.jar

for version 53 it should be java -jar Asr.R53_0_0.b23_M62.jar


STEP 2.


The above java command will ask to choose Metasolv Home directory, a directory asr53installer(asr+version+installer) will be created in the selected directory.


It will automatically invoke setup.sh/setup.cmd in mss_home/asr53installer directory.

STEP 3.


Click Next.

STEP 4.


Enter the path and name of the MetaSolv Home directory, MetaSolv Domain directory, and MetaSolv Server directory or click Open to search for the directories.


STEP 5.


Click Next.


STEP 6.


Select any one of the following installation types:


  •  Install all ASR Files
  •  Install Only ASR EAR File


For a clustered environment, you can choose an option to extract the .EAR file only

For a non-clustered environment, choose the option to install and deploy all files.


STEP 7.


Click Next.


STEP 8.


Click Finish.

STEP 9. 


For a clustered environment.

  1. Locate the loggingconfig_cluster-ASR53.xml file located in the mss_home/managedserver/appserver/config directory, where managedserver is the WebLogic managed server. 
Add the following snippet in appender element for ASR 53.


  <appender name="XMLFileAppASR53" class="org.apache.log4j.RollingFileAppender">
      <param name="ImmediateFlush" value="true"/>
      <param name="append" value="true"/>
      <param name="MaxFileSize" value="10000KB"/>
      <param name="MaxBackupIndex" value="10"/>
      <param name="File" value="${mslv.log.dir}/appserverlog_ASR53.xml"/>
      <layout class="com.metasolv.common.framework.logging.api.log4jext.xml.MSLVXMLLayout">
      </layout>
  </appender>

  <appender name="AuditFileAppASR53" class="org.apache.log4j.RollingFileAppender">
      <param name="ImmediateFlush" value="true"/>
      <param name="append" value="true"/>
      <param name="MaxFileSize" value="10000KB"/>
      <param name="MaxBackupIndex" value="10"/>
      <param name="File" value="${mslv.log.dir}/appserver_auditlog_ASR53.xml"/>
      <layout class="com.metasolv.common.framework.logging.api.log4jext.xml.MSLVXMLLayout">
      </layout>
  </appender>


Add the following snippet in category element for ASR 53.

  <category name="cmm.ASR" class="com.metasolv.common.framework.logging.api.log4jext.MSLVLogger" additivity="false">
    <level value ="error" class="com.metasolv.common.framework.logging.api.log4jext.MSLVLevel"/>
    <appender-ref ref="XMLFileAppASR53"/>
  </category>

  <category name="ASR" class="com.metasolv.common.framework.logging.api.log4jext.MSLVLogger" additivity="false">
    <level value ="debug" class="com.metasolv.common.framework.logging.api.log4jext.MSLVLevel"/>
    <appender-ref ref="XMLFileAppASR53"/>
  </category>

  <category name="cmm.SecurityASR" class="com.metasolv.common.framework.logging.api.log4jext.MSLVLogger" additivity="false">
    <level value ="debug" class="com.metasolv.common.framework.logging.api.log4jext.MSLVLevel"/>
    <appender-ref ref="AuditFileAppASR53"/>
  </category>

   
      2. Rename the file to loggingconfig_cluster-ASR53.xml.

STEP 10.


 RUN the ASR installation in each managed server instance.

STEP 11.


 Restart managed servers.

STEP 12.


RUN prodfixsql/procs sqls.

  1. Run pfixSQL_Master.sql file located in the mss_Home/server/appserver/sql/ASR53/prodfixsql. This sql will call rest of sql files located in same directory.
  2. Run the asr_master.sql file located in the mss_Home/server/appserver/sql/ASR53/procs directory that was created during the installation to apply the contents of the ASR procs directory to the database.


STEP 13.

  1. Undeploy existing ASRversion.ear from application servers
  2. Deploy ASRnewVersion.ear(cluster-ASR53.ear for clustered env) on application servers from admin console.
Changes done in STEP 9 will help in avoiding error while deployment.

“log4j: ERROR Attempted to append to closed appender named [XMLFileApp”

STEP 14.

Modify the gateway.ini , add below entry.

ASR53SERVER=MetaSolv.CORBA.WDIASR53.WDIROOT,MetaSolv.WDIASR53.WDIRootImpl

comment out similar entry for earlier version by placing a semi-colon in front of the entry.

;ASR52SERVER=MetaSolv.CORBA.WDIASR52.WDIROOT,MetaSolv.WDIASR52.WDIRootImpl


I hope this will help installing ASR newer upcoming versions, I will also try to post further the post ASR installation customization (e.g. generate java files from new IDL ASR files) for ASR new versions, please leave your feedback or query.

Saturday, August 27, 2016

Internal Compiler Error - NullPointerException in ReferenceBinding.binarySearch(ReferenceBinding.java:108)

PROBLEM


While compiling java code in Weblogic workshop 10.3(eclipse_3.3.2) encountered below error.

Internal Compiler Error-NPE in ReferenceBinding.binarySearch(ReferenceBinding.java:108)


Internal compiler error
java.lang.NullPointerException
at org.eclipse.jdt.internal.compiler.lookup.ReferenceBinding.binarySearch(ReferenceBinding.java:108)
at org.eclipse.jdt.internal.compiler.lookup.ParameterizedTypeBinding.getMethods(ParameterizedTypeBinding.java:542)
at org.eclipse.jdt.internal.compiler.lookup.Scope.findMethod(Scope.java:1069)
at org.eclipse.jdt.internal.compiler.lookup.Scope.getMethod(Scope.java:2072)
at org.eclipse.jdt.internal.compiler.ast.MessageSend.resolveType(MessageSend.java:428)
at org.eclipse.jdt.internal.compiler.ast.CastExpression.resolveType(CastExpression.java:459)
at org.eclipse.jdt.internal.compiler.ast.Assignment.resolveType(Assignment.java:185)
at org.eclipse.jdt.internal.compiler.ast.Expression.resolve(Expression.java:907)
at org.eclipse.jdt.internal.compiler.ast.Block.resolve(Block.java:100)
at org.eclipse.jdt.internal.compiler.ast.IfStatement.resolve(IfStatement.java:233)
at org.eclipse.jdt.internal.compiler.ast.AbstractMethodDeclaration.resolveStatements(AbstractMethodDeclaration.java:428)
at org.eclipse.jdt.internal.compiler.ast.MethodDeclaration.resolveStatements(MethodDeclaration.java:195)
at org.eclipse.jdt.internal.compiler.ast.AbstractMethodDeclaration.resolve(AbstractMethodDeclaration.java:400)
at org.eclipse.jdt.internal.compiler.ast.TypeDeclaration.resolve(TypeDeclaration.java:1085)
at org.eclipse.jdt.internal.compiler.ast.TypeDeclaration.resolve(TypeDeclaration.java:1164)
at org.eclipse.jdt.internal.compiler.ast.CompilationUnitDeclaration.resolve(CompilationUnitDeclaration.java:366)
at org.eclipse.jdt.internal.compiler.Compiler.process(Compiler.java:626)
at org.eclipse.jdt.internal.compiler.Compiler.compile(Compiler.java:392)
at org.eclipse.jdt.internal.core.builder.AbstractImageBuilder.compile(AbstractImageBuilder.java:362)
at org.eclipse.jdt.internal.core.builder.BatchImageBuilder.compile(BatchImageBuilder.java:174)
at org.eclipse.jdt.internal.core.builder.AbstractImageBuilder.compile(AbstractImageBuilder.java:299)
at org.eclipse.jdt.internal.core.builder.BatchImageBuilder.build(BatchImageBuilder.java:59)
at org.eclipse.jdt.internal.core.builder.JavaBuilder.buildAll(JavaBuilder.java:269)
at org.eclipse.jdt.internal.core.builder.JavaBuilder.build(JavaBuilder.java:172)
at com.bea.wstudio.javabuilderx.JavaBuilderX.build(JavaBuilderX.java:66)
at org.eclipse.core.internal.events.BuildManager$2.run(BuildManager.java:624)
at org.eclipse.core.runtime.SafeRunner.run(SafeRunner.java:37)
at org.eclipse.core.internal.events.BuildManager.basicBuild(BuildManager.java:166)
at org.eclipse.core.internal.events.BuildManager.basicBuild(BuildManager.java:197)
at org.eclipse.core.internal.events.BuildManager$1.run(BuildManager.java:247)
at org.eclipse.core.runtime.SafeRunner.run(SafeRunner.java:37)
at org.eclipse.core.internal.events.BuildManager.basicBuild(BuildManager.java:249)
at org.eclipse.core.internal.events.BuildManager.basicBuild(BuildManager.java:214)
at org.eclipse.core.internal.events.BuildManager.build(BuildManager.java:353)
at org.eclipse.core.internal.resources.Project.internalBuild(Project.java:494)
at org.eclipse.core.internal.resources.Project.build(Project.java:76)
at org.eclipse.ui.actions.BuildAction.invokeOperation(BuildAction.java:195)
at org.eclipse.ui.actions.WorkspaceAction.execute(WorkspaceAction.java:141)
at org.eclipse.ui.actions.WorkspaceAction$1.runInWorkspace(WorkspaceAction.java:460)
at org.eclipse.core.internal.resources.InternalWorkspaceJob.run(InternalWorkspaceJob.java:38)
at org.eclipse.core.internal.jobs.Worker.run(Worker.java:55)


CAUSE


During the Weblogic server installation process we apply multiple Weblogic patches and those need to be cleaned and activated.


SOLUTION


After applying Weblogic patches using smart update, we have to activate those patches and that we can do via below command.

Go to workshop folder in bea home directory(Oracle Weblogic installation directory) and then workshop_10.3 folder and run the command as below.

workshop.exe -clean -initialize


Hope this helps in resolving famous internal compiler error in you weblogic workshop or eclipse, Please leave your feedback or query.

Sunday, May 15, 2016

Metasolv Service Requests PSR, LSR, ASR, ISR explained

Service Requests in Metasolv


Before proceeding with Service Requests quickly understand LATA, LEC and IXC.


LATA(Local Access Transport Area)


A Local Access Transport Area (LATA) is a geographic area served by particular operating companies.
An IntraLATA call is a call made within a LATA.
An InterLATA call is a call made from one LATA to another


LECS AND IXCS

The local phone companies or Local Exchange Carriers (LECs) provide IntraLATA services.
The long distance phone companies or Interexchange Carriers (IXCs) provide InterLATA services.
Refer diagram above.

Now coming back to Service Requests.
Service Requests are the orders that a company receives for products or services. If a company needs a circuit, the company must use a service request to order it. If a company needs a piece of equipment, again it must submit a service request to order it.

Metasolv has following 4 types of service requests

  1. Product Service Request (PSR)
  2. Local Service Request (LSR)
  3. Access Service Request (ASR)
  4. Internal Service Request (ISR)

     Lets have a look at each one of them.

PRODUCT SERVICE REQUEST (PSR)


A product service request (PSR) supports requests for products from end users.
Some examples of products ordered include:

Basic residential service
Dedicated lines
ISDN Basic Rate Interface (BRI)

End users place orders with their providers.


In the above example, 'Customer A' needs a private line to the 'Customer C'. Since both companies use the same local service provider, this scenario requires only one order.
CLEC receives the PSR for a dedicated line between 'Customer A' and 'Customer C'.


LOCAL SERVICE REQUEST(LSR)


A local service request (LSR) handles requests from local service providers for unbundled elements or resale services from the ILECs(Incumbent Local Exchange Carriers).
LSRs and Access Service Request (ASRs) are the two types of orders that are regulated. A regulated
order has to pass standards set by the Ordering and Billing Forum (OBF), which was created to
standardize orders so that all companies utilize the same elements when they submit a service request.


In this example, CLEC Telecom, a new local service provider, wants to provide local service to the XYZ area, which is currently being served by ABC-ILEC.
Before providing service to its end user customers, CLEC Telecom must purchase access to local loops and network interface devices.
The CLEC will attain all the unbundled elements. To accomplish this, it must send an LSR to the ILEC for the purchase of the unbundled elements in the XYZ area.

PURPOSE OF AN LSR


You can use a local service request to order any of the following:
Local loop
Network Interface Device (NID)
Signaling and call-related database
Local and tandem switch access
Operator and directory assistance


ACCESS SERVICE REQUEST(ASR)


An access service request (ASR) is an order for terminating an access connection to a telephony network.

There are two main types of ASRs:
Special Access ASR—For dedicated line telephone network entities (end user to ACTL or CO).
Switched Access ASR—For trunks between network locations, ACTLs, Tandems, and COs.


SWITCHED ACCESS ASR

In the following example, a new LSP (CLEC Telecom) will begin serving customers in the area currently being served by ABC-ILEC.

Before providing local service, CLEC Telecom must complete the ASR for trunks connecting the switching equipment between the two LECs.


In the above example of a Switched Access ASR, an IXC called New IXC wants to sell long distance services to customers being served by CLEC Telecom.
First, New IXC must complete a switched access ASR for trunks between New IXC and CLEC Telecom.

SPECIAL ACCESS ASR

Parent/Child Relationship

A special access ASR is an order for dedicated line telephone network entities such as end user to
ACTLs or COs.


In this example, CustomerA orders a dedicated 56K line to the CustomerB in location B.
Since the two locations are not in the same LATA, the PSR for the private line generates two child
orders:

  • One ASR to CLEC A for special access from CustomerA location to CLEC A ACTL(CO) in location A.
  • Another ASR for special access to CLEC B from CustomerB's location to the CLEC B ACTL(CO).


INTERNAL SERVICE REQUEST


An internal service request (ISR) is simply that, an internal (within your own company) service
request. An ISR is the fastest and easiest order that you can place in the MetaSolv Solution.


Because ISRs are not validated against OBF guidelines, the MetaSolv Solution order-entry process for ISRs is very flexible. ISRs are often submitted as child orders to parent ASRs or PSRs.
Companies create ISRs to document inventory and to provision their own circuits. They use ISRs to
communicate to field personnel which equipment to assign to a circuit.
Also, some companies use ISRs as a standard to build all facility circuits.
Here are the types of circuits associated with an ISR:
Facility circuits
Trunks
Special (for non-ordered circuits that are not facility circuits)
Broadband (for ATM or frame relay, each of which require a facility circuit)

I hope I was able to explain the Metasolv Service Requests, please leave your feedback or query.

Sunday, March 27, 2016

ActiveX Control 'TBSCtrl.ocx' needs to be installed to use Metasolv External Links

PROBLEM


In Metasolv client after clicking on external links user receives below error.

Error screenshot


Error text

ActiveX Control 'TBSCtrl.ocx' needs to be installed to use this feature.
Please contact your MetaSolv Solution Administrator.


CAUSE


1. 'TBSCtrl.ocx' is used to render graphics.
2. 'TBSCtrl.ocx' is required to be registered with operating system on which Metasolv client is running.
3. When 'TBSCtrl.ocx' is not registered the above message is displayed. Usually copying Metasolv folder from 1 machine to other does not register 'TBSCtrl.ocx' on the other machine and causes above error.

SOLUTION


Register the 'TBSCtrl.ocx' on the Operating System where the MetaSolv Solution client is running.
The MetaSolv Solution Zero Admin Client (ZAC) installer will register the required files on the
Operating System where the client(tbs.exe) is being installed.

In order to manually register please follow below steps:

Note: 

You must have administrator privileges to register a dll file. If you encounter a problem
registering the file, contact your Windows Administrator.

1. Open a Command Prompt
2. CD to the directory where the MetaSolv Solution client is installed (e.g. C:\MSS)
3. Register the 'TBSCtrl.ocx' file using the 'regsvr32' command


Hope the article helps you in fixing ActiveX 'TBSCtrl.ocx' error , please leave your feedback or query.

Saturday, March 26, 2016

Weblogic Integration MQ Event Generators not polling and retrieving messages from MQ in a Weblogic clustered environment

PROBLEM


A WLI Event Generator appears not to be consuming messages from an MQ queue.

When there is just one managed server running in a cluster, the Event Generator is retrieving the
messages from MQ.
But as soon as the second managed server is started in the cluster, the Event Generator gets redeployed (suspended for the time the second server is in process of starting and becomes running once the second server is running) and after that it stops picking the messages until the Event Generator is suspended/resumed again at which point it will perform a one time retrieval of message from the queue.

Essentially in a clustered environment, as soon as a new managed server is added (beyond the very first one) into the cluster Event Generator seems to start having problems and it stops polling messages from queue.


CAUSE


This is due to the fact that Server Affinity was disabled in the Connection Factory thus preventing the cluster from knowing which server would process the messages.

Changing the Server Affinity to "true" resolved this issue.

SOLUTION


1. Enable the server affinity for this connection factory or create a new connection factory with this
enabled
2. Create a new MQ Event Generator that uses this new connection factory
3. Restart admin and managed servers
4. Test the scenario again and make sure messages get processed.

Hope above helps in fixing above mentioned issue related to Event Generators in WLI, please leave your feedback or query.

Monday, January 18, 2016

Metasolv M6.2.1 clustered server installation

Installation Scenario


Clustered Server installation will be done on 3 physical unix machines.

Lets say we are installing one domain which has an admin , a loadbalancer server and 6 managed server like test_domain has below

1. test_admin
2. test_loadBalancer
3. test_srvr_1.1(managed server) on unix box 1
4. test_srvr_1.2(managed server) on unix box 1
5. test_srvr_2.1(managed server) on unix box 2
6. test_srvr_2.2(managed server) on unix box 2
7. test_srvr_3.1(managed server) on unix box 3
8. test_srvr_3.2(managed server) on unix box 3

Pre-requisites

1. If you are using a Windows PC with PuTTY to complete this installation procedure, ensure you
    have an Xserver such as Xming running in your Windows environment.

    In your UNIX shell, ensure that you have exported your DISPLAY:
export DISPLAY=172.XX.xx.xx:0.0

2. MSS.R6_2_1.bXXX_DBInstall.zip

3. Java 1.6.0_45  (jdk-6u45-solaris-sparc.sh  AND jdk-6u45-solaris-sparcv9.sh)

4. Oracle WebLogic Integration 10gR3 MP1 (10.3.1) (wli10gR3MP1_generic.jar)

5. Oracle WLI Patches

6. MetaSolv Solution 6.2.1 (MSS.R6_2_1.bXXX_AppServerInstaller.jar)


Steps for installation of MetaSolv


STEP 1.  Java 1.6.0_45 Install


1. Create BEA directory

mkdir  /opt/app/mss/bea

2. Copy executable files.

cp jdk-6u45-solaris-sparc.sh into the “BEA” directory
cp jdk-6u45-solaris-sparcv9.sh into the “BEA” directory

3. Grant permissions to executables.
chmod 754 jdk-6u45-solaris-sparc.sh (make it executable)
chmod 754 jdk-6u45-solaris-sparcv9.sh (make it executable)

4. Run executables.

./ jdk-6u45-solaris-sparc.sh  (run it to extract JDK – will create the “jdk1.6.0_45” directory)
./ jdk-6u45-solaris-sparcv9.sh  (run it to extract JDK – will add files into the “jdk1.6.0_45” directory)

5. Remove (or move) the installer (jdk-6u45-solaris-sparc.sh,jdk-6u45-solaris-sparcv9.sh ) out of this directory


6. Set the following environment variables in your environment:

export JAVA_HOME="/opt/app/mss/bea/jdk1.6.0_45"
export PATH=$JAVA_HOME/bin:$PATH


STEP 2. Oracle WebLogic Integration 10gR3 MP1 (10.3.1) (wli10gR3MP1_generic.jar)

BEA platform installation:

1. In your UNIX shell, export your DISPLAY:

export DISPLAY=172.24.xx.xx:0.0

2. Create a home directory:

mkdir /opt/app/mss/bea/wli10gR3MP1

Note: Please choose your own directory path. Above is just an example.

3. Launch the install process:

java -jar wli10gR3MP1_generic.jar -l
og=/opt/app/mss/bea/wli10gR3MP1/wli10gR3MP1_install.log


Click Next.


Type in BEA Home Directory value.  Click Next.


Click Next.


Click Next.


Click Yes.

Type in Eclipse Home value.  Click Next.


Click Next.


Click Next.


Uncheck “Run Quickstart”. 


Click Done.

In the current directory the installer has created a “cachedir” which can now be removed for clean up purposes:
rm -fR cachedir

STEP 3. Install Oracle WLI Patches (10)


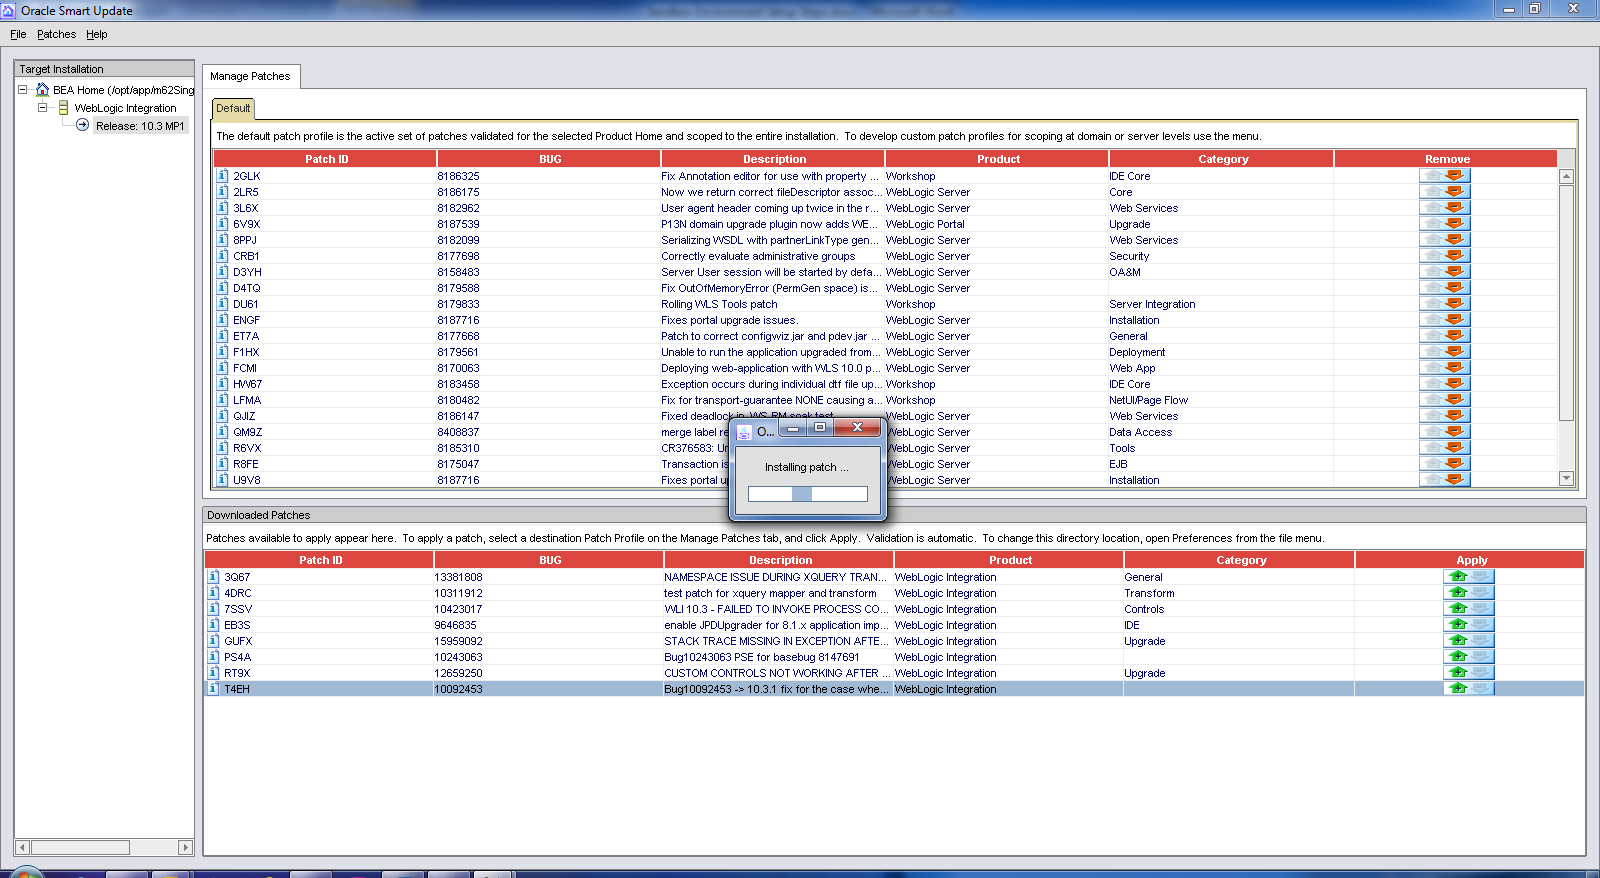
After you install WebLogic Integration 10.3.1, you must install a number of patches.  The patches must be downloaded from the My Oracle Support Web site and can be applied using the WebLogic Smart Update tool. The following private patches will need to be installed:

No.
PaTCH
MSS 6.2.1 Install GUIde
ORACLE Doc ID 1347176.1
PATCH FILENAME
1
EB3S
Yes
Yes
p9646835_103100_Generic.zip
2
PS4A
Yes
Yes
p10243063_103100_Generic.zip
3
7SSV
Yes
Yes
p10423017_103100_Generic.zip
4
4DRC
Yes
Yes
p10311912_103100_Generic.zip
5
RT9X
Yes
Yes
p12659250_103100_Generic.zip
6
3Q67
Yes
Yes
p13381808_103100_Generic.zip
7
GUFX
Yes
Yes
p15959092_103100_Generic.zip
8
2P2M
No
Yes
p12690642_103100_Generic.zip
9
HC67
No
Yes
p14308862_103100_Generic.zip
10
RBRJ
No
Yes
p10041364_103100_Generic.zip
11
5CAZ
No
No
p10008854_103100_Generic.zip
12
1DTZ
No
Yes
p14686000_103100_Generic.zip

Notes:
The PS4A patch must be applied before applying the 7SSV, 4DRC, RT9X, 3Q67, and GUFX patches.
The T4EH patch in the MSS 6.2.1 Install Guide was replaced with the 2P2M patch in Doc 1347176.1
The 5CAZ patch is not part of M6 patch list – found independently to address MQEG issue

Example:

Extract each of the patch files into the Oracle Smart Update Utility ($BEA_HOME/utils/bsu/cache_dir) directory:


unzip ./p9646835_103100_Generic.zip -d /opt/app/mss/bea/wli10gR3MP1/utils/bsu/cache_dir
replace /opt/app/mss/bea/wli10gR3MP1/utils/bsu/cache_dir/patch-catalog_15563.xml? [y]es, [n]o, [A]ll, [N]one, [r]ename: y
  inflating: /opt/app/mss/bea/wli10gR3MP1/utils/bsu/cache_dir/patch-catalog_15563.xml
replace /opt/app/mss/bea/wli10gR3MP1/utils/bsu/cache_dir/README.txt? [y]es, [n]o, [A]ll, [N]one, [r]ename: y
  inflating: /opt/app/mss/bea/wli10gR3MP1/utils/bsu/cache_dir/README.txt
  inflating: /opt/app/mss/bea/wli10gR3MP1/utils/bsu/cache_dir/EB3S.jar

Similarly install other patches as well.

1. If you are using a Windows PC with PuTTY to complete this installation procedure, ensure you have an Xserver such as Xming running in your Windows environment.

In your UNIX shell, ensure that you have exported your DISPLAY:

export DISPLAY=172.24.xx.xx:0.0

2. Launch the WebLogic Smart Update Utility:

cd /opt/app/mss/bea/wli10gR3MP1/utils/bsu

./bsu.sh


Click “OK”.  The client will update itself – wait for it to complete and re-launch itself.


3. Use the WebLogic Smart Update Utility to Apply the patches in the following sequence:

No.
PaTCH
1
EB3S
2
PS4A
3
7SSV
4
4DRC
5
RT9X
6
3Q67
7
GUFX
8
2P2M
9
HC67
10
RBRJ
11
5CAZ

Note:  The PS4A patch must be applied before applying the 7SSV, 4DRC, RT9X, 3Q67, and GUFX patches.
Start by selecting the row for Patch ID = “EB3S” and click on the green arrow in the “Apply” column.


Check the “Do not show this again.” checkbox on the Oracle Support Notice window if it appears.


Click OK.


Patch installed… repeat the patch installation process for all of the required patches in the above specified sequence.

Once you have installed all of the above patches, the “Downloaded Patches” section should be empty.


STEP 4. Prepare for Single/Multiple WebLogic Integration Domains Pointing to the Same Database


Multiple WebLogic Integration domains cannot use the same database schema. WebLogic Integration system tables represent part of a single domain’s internal state. This assumption is embedded in the
WebLogic Integration operations and management algorithms. Because there is no way to distinguish the two sets of data, results are unpredictable. There is a work around solution. You must modify
the mssint.sql file for each standalone server domain or clustered server domain.

[/XXX/XXX/XXX/mssint]$ ls -ltr

-rw-r--r--   1 admin  metasolv     907 Jan 17 23:10 mssint_TEST_INT.sql

File: mssint_TEST_INT.sql


/************** HEADER  *******************/
--      This file provides the sql to create the INTDATA tablespace
--      and the TEST_INT user.
--      Prior to running, update the pathing information.
--      AUTHOR: ST
--      DATE: 1/12/05
-- 8922939 removing defualt passwords
-- Must replace <password here> with password by admin before running the script
/************** HEADER  *******************/


create tablespace INTDATA datafile


        '/oradata/database/xxxxdata.dbf'  size   1500M
        extent management local SEGMENT SPACE MANAGEMENT AUTO;


create user TEST_INT identified by <PASSWORD HERE>


default tablespace INTDATA
temporary tablespace temp
quota unlimited on intdata;


grant connect,resource to TEST_INT;


GRANT WOTSTWTWWOO TO TEST_INT;
/**11692686 granting app_role to TEST_int **/
Grant app_role to TEST_INT;
alter user TEST_INT default role all except WOTSTWTWWOO;
grant create table to TEST_INT;


After creating the users with mssint SQL scripts – GRANT VIEW permission to each user:

GRANT CREATE VIEW TO test_INT;


Note: REPEAT THIS DOMAIN CREATION SEQUENCE FOR ALL DOMAINS.


STEP 5. Create WLI Runtime/Archive schema for each Domain Integration User


If you have multiple server domains that must point to the database, repeat this procedure for each user that you identify.

Recreate the necessary WebLogic Integration tables by completing the following actions:
In the BEA_Home directory (for example, /opt/bea), navigate to the bea directory using the cd command.
For example: cd /opt/bea/wli_10.3/dbscripts/oracle
Enter sqlplus <DOMAIN_INT USER>/<DOMAIN_INT PASSWD>@yourSIDname.
Run the following SQL files:
--> @wli_runtime.sql
--> @wli_archive.sql
Enter commit.
Enter quit.


STEP 6. Create the test_domain WebLogic Domains


If you are using a Windows PC with PuTTY to complete this installation procedure, ensure you have an Xserver such as Xming running in your Windows environment.

1. In your UNIX shell, ensure that you have exported your DISPLAY:

export DISPLAY=172.24.xx.xx:0.0

2. Start the WebLogic Configuration Wizard to setup the WLI domain:

cd $BEA_HOME/wlserver_10.3/common/bin

./config.sh


Select “Create a new WebLogic domain” and click “Next”.


The Select Domain Source window appears.


Select the “Generate a domain configured automatically to support the following products” option and select WebLogic Integration. Click Next.

The Configure Administrative User Name and Password window appears.


Enter a user name and password (e.g U: weblogic, P: weblogic) and verify the password by retyping, then click “Next”.

Note the user name and password. You will need them to log on to the administration console.

The Configure Server Start Mode and JDK window appears.


If you are installing for company operations, select the Production Mode.   If you are installing to do integration development or testing, select “Development Mode”.  Click “Next”.

The Customize Environment and Services Settings window appears.


Change the radio button to Yes and click Next.

The Configure RDBMS Security Store Database window appears.


Select I don’t want to change anything here, then click Next.
The Configure the Administration Server window appears.


Change the “Name” to <DOMAIN>_admin.
Change the “Listen address” to the IP address of the machine.
Change the “Listen port” to the appropriate list port for this DOMAIN.
Check the “SSL enabled” checkbox and Specify the “SSL listen port”.
Click “Next”.

The Configure Managed Servers window appears. 


Click “Add”.


Specify Managed Server Name, Listen address, Listen port, and SSL listen port.

(Repeat Add step for all managed servers to be created on this machine)

Click Next.

The Configure Clusters window appears. 


Click Add.


Specify Cluster Name, Multicast address, and Multicast port.

Click Next.

The Assign Servers to Clusters window appears.

Move the Server items to the Cluster.


Click Next.


Click Next.

The Configure Machines window appears.


Click “Next”.

The Assign Servers to Machines window appears.

Move the Server items to the appropriate Machine.


Click Next.


The Configure JDBC Data Sources window appears.

Enter the configuration information for the JDBC data sources, click on each data source tab. Perform the following steps:

1.       Click the cgDataSource tab, enter values in the following fields:
a.       In the Database type list, select Oracle.
b.      In the Driver list, select Oracle’s Driver (Thin XA) Versions: 9.0.1, 9.2.0, 10, 11.
c.       Select the Supports global transactions and the Two phase commit options.
d.      For the DBMS name, enter the Oracle system ID (SID).
e.      For the DBMS host, enter the name of your database server.
f.        For the DBMS port, enter the port number for the database server.
g.       For the User name, enter <DOMAIN>_INT.
For the User password (and Confirm user password), enter the Oracle user password.


       Click the portalDataSource tab, enter values in the following fields:
a.       In the Database type list, select Oracle.
b.      In the Driver list, select Oracle’s Driver (Thin) Versions: 9.0.1, 9.2.0, 10, 11.
c.       Select the Supports global transactions and the One phase commit options.
d.      For the DBMS name, enter the Oracle system ID (SID).
e.      For the DBMS host, enter the name of your database server.
f.        For the DBMS port, enter the port number for the database server.
g.       For the User name, enter <DOMAIN>_INT.
h.      For the User password (and Confirm user password), enter the Oracle user password.


Click the p13nDataSource tab, enter values in the following fields:
a.       In the Database type list, select Oracle.
b.      In the Driver list, select Oracle’s Driver (Thin) Versions: 9.0.1, 9.2.0, 10, 11.
c.       Select the Supports global transactions and the One phase commit options.
d.      For the DBMS name, enter the Oracle system ID (SID).
e.      For the DBMS host, enter the name of your database server.
f.        For the DBMS port, enter the port number for the database server.
g.       For the User name, enter <DOMAIN>_INT.
h.      For the User password (and Confirm user password), enter the Oracle user password.


 Click the cgDataSource-nonXA tab, enter values in the following fields:
a.       In the Database type list, select Oracle.
b.      In the Driver list, select Oracle’s Driver (Thin) Versions: 9.0.1, 9.2.0, 10, 11.
c.       Select the Supports global transactions and the Emulate two phase commit options.
d.      For the DBMS name, enter the Oracle system ID (SID).
e.      For the DBMS host, enter the name of your database server.
f.        For the DBMS port, enter the port number for the database server.
g.       For the User name, enter <DOMAIN>_INT.
h.      For the User password (and Confirm user password), enter the Oracle user password.


Click the bpmArchDataSource tab, enter values in the following fields:
a.       In the Database type list, select Oracle.
b.      In the Driver list, select Oracle’s Driver (Thin) Versions: 9.0.1, 9.2.0, 10, 11.
c.       Select the Supports global transactions and the Emulate two phase commit options.
d.      For the DBMS name, enter the Oracle system ID (SID).
e.      For the DBMS host, enter the name of your database server.
f.        For the DBMS port, enter the port number for the database server.
g.       For the User name, enter <DOMAIN>_INT.
h.      For the User password (and Confirm user password), enter the Oracle user password.


After the data sources have been configured, click on Test Connections.
The Test Data Source Connections window appears.


Test each data source by clicking Test next to each data source. Once all the tests have passed, click Ok and then Next.

The Run Database Scripts window appears.


For each data source, select the available files and the DB Version, then click Run Scripts.

After all the scripts have been run for each data source, Click Next.

NOTEFor the cgDataSource-nonXA data source, select the 11g database version and for the p13nDataSource, select the 10g database version.


Click Next .


The Configure JMS File Stores window appears.


Click Next.

The Review WebLogic Domain window appears.


Review the summary information displayed to verify that all the information is correct. Click “Next”.

The Create WebLogic Domain window appears.


Do the following:
a.       Enter the Domain name = ‘TEST_domain’
b.      Enter the Domain location = /opt/app/mss/domains’
c.       Enter the Application location = /opt/app/mss/applications’

Click Create.

The Creating Domain window appears, indicating the progress during the creation of the domain.


Click Done when the configuration creation is complete.

Note: REPEAT THIS DOMAIN CREATION SEQUENCE FOR ALL DOMAINS.

STEP 7. Install MetaSolv Solution 6.2.1 (MSS.R6_2_1.b804.3_AppServerInstaller.jar)


1. The instructions for creating the domain configuration included starting the server after the configuration was complete.  Leave the server running until you are instructed to shut it down.

2. Ensure that the following environmental variables are set:

JAVA_HOME= /opt/app/mss/bea/jdk1.6.0_45
PATH=$JAVA_HOME/bin:$PATH
BEA_HOME= /opt/app/mss/bea/wli10gR3MP1

3. If you are using a Windows PC with PuTTY to complete this installation procedure, ensure you have an Xserver such as Xming running in your Windows environment.

In your UNIX shell, ensure that you have exported your DISPLAY:

export DISPLAY=172.24.xx.xx:0.0

4. Launch the install process:

cd /opt/app/mss/m6core/XXXX_domain

java -jar ../MSS.R6_2_1_804.b3_AppServerInstaller.jar

The Select MetaSolv home directory window appears.


Click “Select”.  The Oracle Communications MetaSolv Solution Installation window appears.


Click “Next”.  The Oracle Communications MetaSolv Solution Installation - Choose Install Type window appears.


For XML API installations: select Full Installation on WebLogic Integration Domain (WLI) and click Next.

The Oracle Communications MetaSolv Solution Installation - Select Server window appears.

Do the following:
a.       Enter the Admin Host name for the Domain  (e.g. 172.24.XX.XX)
b.      Enter the port number for the Admin Host.  (e.g. 6010)
c.       Enter the WebLogic console admin user name and password.  (U:weblogic, P:weblogic)


Click “Go”.

The installation program queries the Admin Host machine and returns with values you entered during the configuration of the WebLogic domain. This process can take a few moments.

The Oracle Communications MetaSolv Solution Installation window appears with the domain and any servers in the domain appearing in the left pane.

In the tree view on the left, select the check box next to the single server you want MSS installed on.
Tabs appear in the right pane for information to be entered for the selected server.

Click the Cluster checkbox and enter the path and name of the MetaSolv home directory, WebLogic domain directory, and WebLogic Home directory or click Browse to search for the directories.


Click the Oracle tab.

Specify values in the Oracle Server Name, Oracle Port#, and the Oracle Service Name fields.
Change the value of the User name for Integration Connection Pools to be <DOMAIN>_INT.
Enter the passwords for the APP_MSLV, APP_API, and <DOMAIN>_INT users.


Click the Gateway tab.


Check the default selections for event servers that are to be activated, and make any necessary changes.

Note:  For XML API installations, the INTEGRATIONSERVER option must be checked.

Click the Port tab.


Click the Proxy tab.  Enter Proxy Server URL.


We did not touch the Oracle RAC tab…


When all tabs have correct information for the single server, click Next.

The installation summary appears.


After checking the information in the summary for accuracy, click Install. When the files are installed, the location of the startup file created for the server is displayed.

Caution: Do not exit the installation program.

Note the location of the startup file for the application server, and then minimize the installation program window.


Shut down the server, and restart it using the custom script installed by the installation program and listed on the window.

Start the WebLogic Server Administration Console and login via browser:

     http://host_ip_address:port number/console

You can monitor the deployment from the console. To check the servers, click Servers in the Console, and the right pane will show the status of all servers.

After the startup commands have been run and the application server has been started, maximize the installation program window and click Deploy Application.


Select a server in the Target Servers list box, and click Deploy.

The deployment process begins. You can follow the progress of the deployment by viewing the text that appears in the right pane of the installation window.

When the deployment is complete, the Deployment Completed window appears.


Click OK.


Click Exit.  The Exit? window appears.


Click OK to exit.


STEP 8. Verifying the MSS Installation


Verification is done from the WebLogic Server Administration Console on a client workstation.
To verify the installation, do the following:

1.       From a client workstation, close all open applications and start a web browser.
2.       Enter the following information into the Address field to bring up the WL Console:


3.       Log on to the Administration Console using your user name and password (U: weblogic, P: weblogic)
4.       The WebLogic Server Console window appears.


5.       In the left pane, under the domain , click on Deployments.verify that the following applications appear in the list:


For XML API option only:
·         calendar-ejbs
·         httpEG_ear
·         jcaEG_ear
·         mss-integration (or cluster-mss-integration?)
·         mqEG_ear
·         nur (or cluster-nur?)
·         rdbmsEG_ear
·         tibRVEG_ear
·         worklist-admin
·         worklist-ejbs-worksub

non-XML API option only:
·         nur


  6.    From the Domain Structure tree, expand Services, then expand JDBC, then click on Data Sources in the left pane. The list of available data sources and connection pools appears in the pane on the right of the screen.

Ensure the following Data Sources are configured as shown:


 7.      (XML API option only) In the left pane, click on DOMAIN_NAME, then click on Services, then click on Messaging, then click on JMS Modules. The list of available JMS modules appears in the pane on the right of the screen.
 In the right pane, click on configwiz-jms.  The list of available resources appears in the pane on the right of the screen.

Verify that the following JMS connection factory is present in the list of resources (XML API option only):

·         MSS.QueueConnectionFactory

Verify that the following destinations are included in the list of resources (XML API option only):
·         API.queue.AsyncDispatcher
·         API.queue.AsyncDispatcher_error
·         mss.internal.event.queue
·         mss.external.event.queue

Hope the article helps hassle free installation of Metasolv application servers on UNIX machines. Please leave your feedback or query.